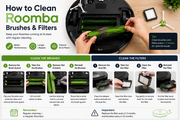
Your Roomba works hard. It crawls under furniture, bumps into table legs, and eats hair and dust so you do not have to. But like any machine that runs every day, it needs regular cleaning. If you ignore the brushes and filters, the vacuum gets weaker, the battery drains faster, and eventually the robot starts throwing error codes or leaving dirt behind.
The good news is that cleaning a Roomba takes about ten minutes once you know what you are doing. The bad news is that most people only clean the obvious parts and miss the spots where real problems hide.
This guide covers every brush and filter on every major Roomba series, from the older 500 and 600 models to the newer i7, j7, and S9 lines. It also explains how often to clean each part, when to replace instead of clean, and the hidden maintenance tricks that keep the machine running for years.
01. Why cleaning matters more than you think
A clogged filter does not just smell bad. It forces the vacuum motor to work harder, which pulls more power from the battery and generates extra heat. Over time, that heat degrades the battery cells. A brush wrapped with hair does not spin freely, so the motor that drives it strains against the resistance. That is how gears strip and motors burn out.
The filter is the other half of the problem. iRobot recommends replacing the filter every two months, but that assumes average use. If you run the Roomba daily, or if you have pets, the filter wears out faster. iRobot also suggests cleaning the filter once per week, or twice per week in homes with pets. That sounds like a lot, but tapping the filter against the inside of a trash can takes thirty seconds. It is worth the habit.
02. What you need before you start
You do not need much. A small Phillips-head screwdriver handles the side brush on most models. A pair of needle-nose pliers helps pull hair out of tight spots. A dry paintbrush or an old toothbrush knocks dust off the filter and out of corners. Keep a microfiber cloth nearby for wiping the bin and sensors. Some owners like to use a can of compressed air to blow dust out of the internal compartment, but that is optional. Do not use water on the filter unless your manual specifically says the filter is washable. Most Roomba filters are paper-based and fall apart when wet.
03. Know your model: bristle brushes vs. rubber extractors
Roombas fall into two brush categories. The 500, 600, and 700 series use a traditional bristle brush and a rubber beater bar that work together to sweep debris into the suction path. The 800, 900, e, i, j, and S series use two rubber roller brushes that spin in opposite directions. iRobot calls these "AeroForce" or "Dual Multi-Surface Rubber Brushes."
The cleaning process is similar for both, but the rubber rollers are easier to maintain because hair does not tangle into bristles. Instead, it wraps around the rollers or gets packed into the end caps. Both systems have a small spinning side brush that sweeps debris from edges and corners into the robot's path. That side brush is where most people find the worst hair tangles.
04. Cleaning the main brushes
Start by flipping the Roomba upside down on a flat surface. You will see a yellow or green brush guard that holds the main brushes in place. Lift the two tabs on the guard and remove it. The brushes lift straight out.
Bristle Brushes (500, 600, 700 Series)
If you have a 600 series or older model with bristle brushes, pull the hair off the bristles with your fingers or a comb. Pay attention to the ends of the brushes where they meet the yellow plastic bearings. That is where hair wraps into a tight coil and eventually works its way into the gearbox. Pop off the yellow end caps by gripping the small tab with pliers and pulling straight out. You will often find a dense spool of hair hiding underneath. Remove it, wipe the metal axle clean, and snap the cap back on.
Rubber Rollers (800, 900, e, i, j, S Series)
For the 800 series and newer models with rubber rollers, the process is simpler but has one extra step. The two rollers are different colors, usually one dark and one light, and they sit in specific slots. Note which roller goes where before you remove them. Wipe the rubber fins with a dry cloth and pull off any hair. Then remove the plastic end caps on the non-drive ends of the rollers. On some models, these caps pull off by hand. On others, you need to fold the plastic slightly and grip with pliers. Underneath each cap, you will find a brass bearing on a steel shaft. Hair collects here and locks the bearing in place, which causes the "Error 2: Clean Brushes" message even when the rollers look clean. Pull the hair off the shaft, add a tiny drop of light machine oil or sewing machine oil to the brass bearing, and reassemble.
The drive ends of the rollers, where the square or hex-shaped connectors plug into the gearbox, also need attention. Wipe the connectors clean and check the circular gap around each socket. That is a friction point where plastic rotates against plastic. A drop of oil there every few months prevents wear and reduces the noise.
05. Cleaning the side brush
The side brush is the small three-armed spinner near the front edge of the robot. It is held down by a single screw in the center. Remove the screw, lift the brush straight up, and you will see the post underneath. Hair wraps around this post and works its way down into the gear housing. Pull it all off, wipe the post clean, and replace the brush. Do not overtighten the screw. The brush needs to spin freely, and a crushed plastic mount will bind it up.
On the S9 series, the side brush has shorter bristles because the D-shaped body already reaches deep into corners. The cleaning process is the same, but the screw is smaller, so use the right size screwdriver to avoid stripping the head.
06. Cleaning the filter and dust bin
The filter sits inside the dust bin. Remove the bin from the robot, open the filter door, and pull the filter out. Most Roomba filters are rectangular paper cartridges with a rubber gasket around the edge. Tap the filter against the inside rim of a trash can to knock loose dust and debris. Use a soft brush to clean between the pleats. Do not rinse the filter with water unless your manual explicitly says it is washable. The standard filters on the 600, 800, i7, and S9 series are not washable. Water breaks down the paper and ruins the filtration.
If the filter looks gray, clogged, or emits a musty smell when you tap it, replace it. iRobot says every two months, but many owners replace theirs every four to six weeks in homes with pets or heavy dust. The filter is cheap. A degraded filter costs you battery life and cleaning performance.
The dust bin itself needs cleaning too. Empty it after every run. Once a week, wipe the interior with a damp cloth to remove fine dust that sticks to the walls. If your model has a blue rubber squeegee inside the bin, pull it out and rinse it. Let it dry completely before reinserting.
07. Deep cleaning the front wheel and sensors
The front caster wheel is not a brush or a filter, but it causes more "Error 2" messages than almost any other part. Pull the wheel assembly straight out of the socket. The wheel itself pops out of the plastic housing. Check the metal axle and the inside of the housing for wrapped hair. On older models, the front wheel is fixed and harder to clean, but the same principle applies: get the hair out, wipe the axle, and snap it back together.
While you have the robot upside down, wipe the cliff sensors, the charging contacts, and the floor-tracking sensor with a dry cloth. Dust on these sensors confuses the navigation and can cause the robot to act erratically.
08. Self-emptying base maintenance
If you own an i7+, j7+, or S9+ with the Clean Base, you have one more item to track: the disposable debris bag inside the base. The i7+ and S9+ bases hold about thirty days of debris. The j7+ uses a more compact base that holds up to sixty days. When the bag is full, pull the cardboard tab to seal it, discard it, and insert a new bag. Do not try to reuse the bags. They are designed to seal tightly and the cardboard tab wears out after one use.
The base itself needs little maintenance, but the suction port where the robot docks can collect dust. Wipe it monthly with a dry cloth.
09. When to replace instead of clean
Brushes and filters are wear items. No amount of cleaning restores a filter whose paper media is packed with fine dust, or a brush whose bristles are bent and frayed. Replace the main brushes every six to twelve months depending on use. Replace the side brush every three to six months. It is a cheap part and a fresh one spins more efficiently. Replace the filter every two months, or monthly if you have shedding pets.
The rubber rollers on newer models last longer than bristle brushes, but they still degrade. If the rubber fins are cracked, torn, or no longer flex properly, the rollers will not agitate debris effectively. Replace them as a pair.
| Component | Clean Frequency | Replace Frequency | Tools Needed |
|---|---|---|---|
| Filter | Weekly (Twice if pets) | Every 2 months | Dry brush or cloth |
| Main Brushes | After every run | Every 6-12 months | Pliers, Comb |
| Side Brush | Weekly | Every 3-6 months | Phillips Screwdriver |
| Front Wheel | Weekly | Every 12 months | None (Pops out) |
10. Troubleshooting common problems
Encountering issues? Here are quick solutions to the most common Roomba problems.
Error 2: Clean Brushes (but they look fine)
The problem is almost always hidden hair in the end caps or a locked front wheel. Remove the end caps from both rollers and check the brass bearings. Also pop the front wheel out and check the axle. Nine times out of ten, that fixes it.
Roomba is weak and leaves dirt behind
Check the filter first. A clogged filter chokes the airflow and reduces suction. If the filter is clean, check the bin seal and the rubber squeegee inside the bin. A worn or misaligned squeegee lets debris fall back onto the floor.
Side brush spins slowly or not at all
Remove the screw and check for hair wrapped around the post. Also check that the screw is not overtightened. The brush should spin freely with a flick of your finger.
11. Building the habit
The easiest way to keep your Roomba healthy is to clean it immediately after it finishes a run, while the bin is still in your hand. Empty the bin, tap the filter, pull any obvious hair off the brushes, and check the front wheel. That takes two minutes. Once a week, do a deeper clean: remove the brushes and side brush, pop the end caps, wipe the bin, and check the sensors. Once a month, add a drop of oil to the brush bearings and the drive connectors.
A clean Roomba runs quieter, cleans better, and lasts years longer than a neglected one. The filters and brushes are inexpensive, but the robot itself is not. Ten minutes of maintenance each week protects an investment that saves you hours of vacuuming every month. That is a fair trade.